How to build an AI agent in Typescript with OpenAI API
14 February 2026

What is an AI Agent?
An AI agent is a system that allows large language models to perform actions and access external data sources using tools provided by a developer. It’s a simple flow but a beautiful dance between the client side application and the LLM provider API. In this tutorial, we will learn how to build AI agents which are essentially LLM calling functions in a loop. But what does it mean for an LLM to call a function? and how does calling functions turn an LLM, a next token predictor which can only generate text, into an agent that does work in the real world, accesses realtime information through the web, executes code and other fascinating actions?
The official OpenAI documentation gives you a basic start on how function calling works but in this guide we will deep dive into all the confusing details and explain the various arguments to the OpenAI Responses API .create() and stream() methods, the response.output object, streaming and other minute engineering details that are overlooked in the definition of an AI agent as an LLM calling tools in a loop. The aim is that after going through this tutorial from beginning to end you can build your own working AI agent.
We are using Typescript for this guide because firstly, it is an industry favourite for building AI agents. It has top-tier developer tooling that agents can rely on: Language Server Protocol (LSP) which provides hover types, autocomplete and jump-to-definition, great diagnostics to pinpoint what exactly is wrong and where and its type checking strong correctness guarantees via types over Javascript. Cursor and Cline are two popular AI coding agents that are written in Typescript. Popular agent frameworks like the OpenAI Agents SDK, Langchain and Vercel AI SDK are also either written in Typescript or provide Typescript versions to allow you build agents reliably.
We use the Responses API instead of ChatCompletions because it’s designed specifically for agentic workflows. Tool calls are first-class items, not bolted onto chat messages, it supports multi-tool loops inside a single request, and it can preserve tool and reasoning state across turns, which makes complex agents easier to build and more reliable. OpenAI also reports measurable gains for agentic usecases: GPT-5 used via Responses scored about 5% better on TAUBench than Chat Completions by leveraging preserved reasoning, and internal evals show about a 3% improvement on SWE-bench when using reasoning models with Responses under the same prompt.
Requirements
To follow along with this tutorial, you will need:
- Node.js 18+ installed on your machine
- An OpenAI API key (get one here)
- Basic knowledge of JavaScript/TypeScript (syntax explanations are provided where necessary)
How the Agent System Works
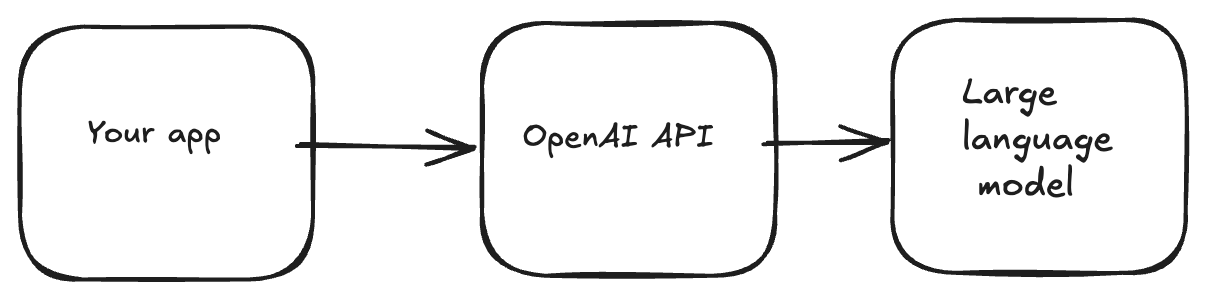
Before, we dive into the code, I would like to provide a systems-level explanation of the AI agent. At the core of the AI agent system sits the large language model. The OpenAI API sits between your application code and the model.
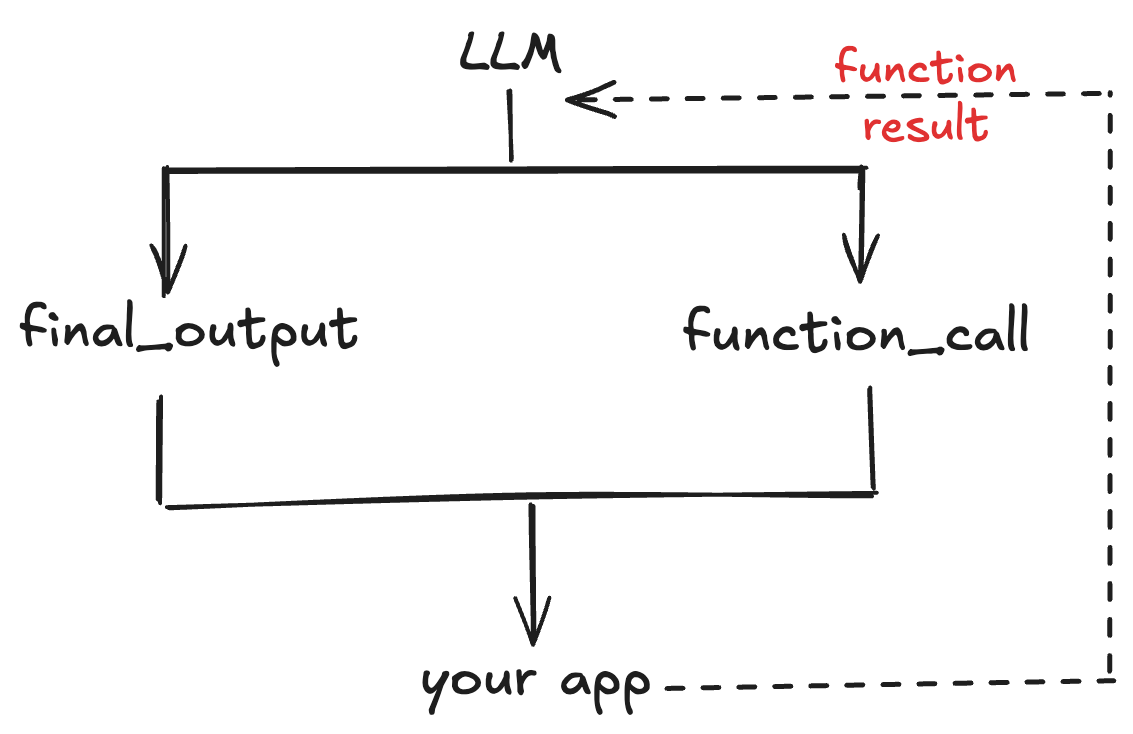
In an agent system, the model can either choose to return its final output: be it text, images, audio , video or call a function. After the model selects a function to call, control flows back to your application to execute the function and provide the result to the model, which it will then use to produce its next response, which could be another function call or an assistant response - the text that users see.
Messages to the Responses API have a defined schema where each entity in the response lifecycle has a role assigned to them. Messages from an end user of an application take the user role, messages from an application developer take the developer role and messages from the LLM take the assistant role.
Project Setup
Let’s set up a project for this tutorial. Run in your terminal:
mkdir agent-loop && cd agent-loopOpen the folder in your choice IDE and install the dependencies we will be needing:
npm install openai dotenv
npm install -D ts-node typescript @types/node
npx tsc --init
Paste this into the tsconfig.json file
{
	"compilerOptions": {
		"target": "ESNext",
		"lib": ["ES2022", "DOM"],
		"module": "NodeNext",
		"moduleResolution": "NodeNext",
		"strict": true,
		"skipLibCheck": true,
		"verbatimModuleSyntax": false,
		"resolveJsonModule": true,
		"esModuleInterop": true,
		"moduleDetection": "force",
		"noEmit": true,
		"forceConsistentCasingInFileNames": true,
		"allowSyntheticDefaultImports": true,
	}
}
Writing the Tool
First, let’s write the function that we will be using throughout this tutorial. Create a tools.ts file in the folder:
touch tools.tsThe Holiday Checker Function
Here we are writing a holiday checker function. It takes year and country code as arguments and returns data about any public holiday in a country. It sends a request to an open PublicHolidays API to receive this data, so, don’t worry, you don’t need an API key to use this API.
import type { Tool } from "openai/resources/responses/responses";

export async function holidayChecker(args: { year: number, countryCode: string }) {
	const year = args.year;
	const countryCode = args.countryCode.toUpperCase();
    const url = `https://date.nager.at/api/v3/PublicHolidays/${year}/${countryCode}`;

	const res = await fetch(
		url,
		{
		headers: {Accept: "application/json"},
	});

	if (!res.ok) {
		const body = await res.text().catch(() => "");
		return { error: {
			type: "PublicHolidaysAPIError",
			status: res.status,
			statusText: res.statusText,
			body: body.slice(0, 200),
			retryable: res.status >= 500,
	}};
}

	const data: Array<{
		date: string;
		localName: string;
		name: string;
		fixed?: string;
		global?: boolean;
		counties?: string[] | null;
		types?: string[];
		}> = await res.json();

	const holidays = data.map((h) => ({
		date: h.date,
		name: h.name,
		localName: h.localName,
		global: h.global ?? true,
		types: h.types ?? [],
		counties: h.counties,
		fixed: h.fixed,
	}));

	return {
		year,
		countryCode,
		count: holidays.length,
		holidays,
	};
}
Let’s do a line-by-line breakdown of this code. You might have noticed that we imported the Tool type from the OpenAI SDK but we don’t use it inside this function. That’s okay: Tool is used when we define the tool schema later, so the model can understand how to call this function in the agent loop. For now, we’re just focusing on what holidayChecker does.
The function accepts an args object with two fields: year (a number) and countryCode (a string). We extract year, and we normalize countryCode by converting it to uppercase so values like "fr" become "FR". Then we build a URL that calls the Nager.Date PublicHolidays API using those values as path parameters.
Next, we use fetch() to request the holiday data as JSON. If the request fails (res.ok is false), we read up to 200 characters of the response body and return a structured error object. This is useful in an agent loop because we can send that error back to the model so it can recover, for example by correcting an invalid country code.
If the request succeeds, we parse the JSON response into a data array. Each element in data represents a holiday entry returned by the API. We then create a new array called holidays by mapping over data and selecting the fields we care about, while also providing safe defaults (for example global ?? true and types ?? []) in case any fields are missing.
Finally, we return an object containing the year, the normalized countryCode, the total number of holidays (holidays.length), and the cleaned holidays array.
The Tool Schema
Next, we will turn this holidayChecker function into a tool by creating a tool definition for it. A tool definition is a special JSON schema object defined by LLM APIs (OpenAI, Anthropic and all LLM providers that provide function calling models support this) that provides details about functions defined on the client side for LLMs to use. The LLMs are trained to recognize this schema and use information provided in the schema to decided when to call a function and the arguments to call it with, if any. Essentially, the tool schema turns a function from just code declaring a self-contained functionality into a tool that an LLM can execute.
Here is the tool schema for our holidayChecker function:
export const tools: Tool[] = [
	{
		type: "function",
		name: "get_public_holidays",
		description: "Get the list of public holidays for a given year and country code (eg. GB, NG, US)",
		parameters: {
			type: "object",
			properties: {
				year: {
					type: "string",
					description: "The year to check for. an integer. e.g., 2025, 2024."
				},
				countryCode: {
					type: "string",
					description: "The ISO country code of the country to retrieve national holidays for. e.g, GB, UK, US"
				}
			},
			required: ["year", "countryCode"],
			additionalProperties: false,
		},
		strict: true,
	},
]
Let’s provide a breakdown of the tools schema. The first thing to note is that tools is an array that can hold multiple functions. Second, we have assigned tool to the Tool type provided by the OpenAI SDK. This means that in our agent loop, our model cannot mistake the tools for any other kind of object, one of the big advantages of creating agents in Typescript. You get strict typing.
Moving further down, our function contained in the tools array is a map data type with multiple keys and values. The type key indicates to the model that this is a function or this map object holds information about a function. We also give the function a name: “get_public_holidays” which uniquely identifies the function to the model and inside the OpenAI API. When the model decides to use our function, the name is how we track The description gives the model a brief explanation of what the function does and the parameters values gives the model information about function parameters.
In an agent loop, when the model calls a function, it fills in the arguments your client will use to execute that function. All the information the model needs, such as the tool name and the argument schema, is defined in the tool schema (which uses JSON Schema). Because JSON Schema supports real types, you can declare parameters as integer, boolean, array, and so on, not just strings. When the model calls a tool, the API returns arguments as a JSON string, so we first parse it with JSON.parse() to get a JavaScript object. If the schema declares year as an integer, the parsed value will typically already be a number. If it comes through as a string (for example "2026"), we then validate and convert it (for example with Number(year)) before calling the function.
The required value tells the model inside the agent loop that the parameters are needed for the function to work, ie, they are not optional parameters.
additionalProperties: false tells our model that any parameters not provided in the schema is not allowed, so for example, this stops the model from hallucinating arguments that our function is not expecting. Finally, strict: true is another hallucination-control mechanism that ensures that our model follows the exact schema we have defined at a top level, so, we are telling the model, use this exact name and these exact arguments as defined in this tool schema to access the function that does what description tells you, nothing more, nothing less.
Connecting the Tool to the Function
So, now we have the function: holidayChecker and its schema: get_public_holidays, but how do we connect the two? We do this by defining a toolHandler record which maps the tool name to the function.
export const toolHandlers: Record<string, (args: any) => Promise<any>> = {
	get_public_holidays: holidayChecker,
}
This handler is the key to the agentic loop. It is how we autonomously execute functions on our client side after our model selects it through the function_call_output in the OpenAI API and provides arguments for it. You will see this in action when we get to the agent loop code.
Building a Single-Turn Agent
Now that we have a function, a tool, and a handler mapping the tool to the function, we are ready to write the agent loop. For our first example, let’s start with the most basic case: a single turn agent, meaning that this agent can receive input and return output only once.
Create a single-turn-agent file and a .env file. Add your OpenAI API Key to the .env file.
touch single-turn-agent.ts .env
OPENAI_API_KEY=sk....
Write this code for the single turn agent into the file. To run the typescript code will be writing and get the outputs that we will be going over throughout the tutorial, run:
npx ts-node single-turn-agent.tsThis uses ts-node to compile and run our typescript files directly instead of emitting javascript files and then running those.
import OpenAI from "openai";
import "dotenv/config";
import { tools, toolHandlers } from "./tools";
import { ResponseInput } from "openai/resources/responses/responses";


async function main(){
	// define the openai client
	const client = new OpenAI({
	apiKey: process.env.OPENAI_API_KEY,
	});
	// create the conversation history

	let conversationHistory: ResponseInput = [
		{
			role: "user",
			content: "What is the next public holiday in France?"
		},
	];

	let response = await client.responses.create({
		model: "gpt-5",
		input: conversationHistory,
		tools,
	});

	// after the first model tool call response, append the output from the model response to the conversation history
	console.log(JSON.stringify(response.output, null, 4));
	conversationHistory.push(...response.output);
	console.log(response.output_text);

	// execute the function call
	for (const item of response.output) {
		if (item.type === "function_call") {
			const toolName = item.name;
			const handler = toolHandlers[toolName];
			const rawArgs = item.arguments ?? "{}";
			const args = JSON.parse(rawArgs);
			const public_holiday = await handler(args);
			const output = JSON.stringify(public_holiday, null, 4);

			// add the result of the function call to the conversation history
			conversationHistory.push({
				type: "function_call_output",
				call_id: item.call_id,
				output: output
			});

		console.log("model input after function call:\n");
		console.log(JSON.stringify(conversationHistory, null, 4));
		}
	}

	// call the client a second time with the function call output now in the conversation history

	response = await client.responses.create({
		model: "gpt-5",
		instructions: "Provide the public holiday for the country the user requests.",
		input: conversationHistory,
		tools,
	});


	//console.log(JSON.stringify(response.output, null, 4));
	console.log(response.output_text);

	// print the model response
	console.log(response.output_text);
}

main().catch((err) => {
	console.error(err);
	process.exit(1);
});
Sending the First Request
Let’s take each section of this code and explain it in detail.
import OpenAI from "openai";
import "dotenv/config";
import { tools, toolHandlers } from "./tools";
import { ResponseInput } from "openai/resources/responses/responses";
The first line imports the OpenAI client into our project.
On the second line we import the dotenv module to read the OPENAI_API_KEY environment variable. Next, we import the tools and tool handlers from our tool file. Finally, we import the ResponseInput type from the OpenAI SDK so that the conversation history we build is not just any list of items but a properly typed object.
	async function main(){
		const client = new OpenAI({
		apiKey: process.env.OPENAI_API_KEY,
		});
We instantiate the client that we will be using to interact with the OpenAI API and pass your API key.
	let conversationHistory: ResponseInput = [
		{
			role: "user",
			content: "What is the next public holiday in France?"
		},
	];
This is where we pass our sole input to the model. Think of this as the prompt you send in ChatGPT or Claude Code. The OpenAI API expects inputs to the model to be a list of map objects with each message having a role attached to it. This message has a user role indicating to the model that it is from the end user rather than a developer.
This helps in areas like safety allowing us to control the model’s behaviour and enforce refusals for example where a user is asking the model to do something that we don’t allow. So the model will accord more importance or obedience to a message with developer role over a message with a user role.
let response = await client.responses.create({
	model: "gpt-5",
	input: conversationHistory,
	tools,
});
Here we use the create method to send our message to the model. Let’s explain the parameters that we are using here. model and input are required parameters, we need these for the function to work at all. model tells the API which model we are sending the request to through an model_id . So for example putting gtp-5 would throw an error because such a model does not exist on the API. input is our list of messages that we are sending to the model and receive a response to. tools is the our tool schema, we could have written tools: tools but since the key and value are both the same we can use the shorthand in typescript and we don’t need to write tools twice.
tools is an optional parameter unlike model and input but since we are building an agent not a chat assistant, I would say it is the most important parameter here, it gives us the ability to give the model functions which turns this model from an assistant that can just say things to an agent that can actually do things.
There are other optional parameters that you can pass into .create(). You will use some of them when we write the multiturn version of our agent loop later.
Understanding the Response Output
After creating a request we are ready to receive a model response from the API. We will break down the response.output object that the API call returns in detail. Let’s print out it first.
console.log(`First response output: \n${JSON.stringify(response.output, null, 2)}`);This should return an output that looks like this:
[
  {
    "id": "rs_0540550ad113a5a40069849575b3988195bd6bcfd4cc297946",
    "type": "reasoning",
    "summary": []
  },
  {
    "id": "fc_0540550ad113a5a4006984957b45a48195bcde6731d55476a9",
    "type": "function_call",
    "status": "completed",
    "arguments": "{\"year\":\"2026\",\"countryCode\":\"FR\"}",
    "call_id": "call_xET4e78dv4dmAJdDzV1MOKsI",
    "name": "get_public_holidays"
  }
]
First thing to point out is that the return object is a JSON object hence the need to use stringify() to convert it to readable string keys and values else our console output would look something like this :
[object Object],[object Object]Our output is a list of maps from the model. Each map contains an id, type and other key-value pairs depending on the type of model response it contains. So response.output[0] is a reasoning object with a currently empty summary, we will handle that in the next example when we do multiturn, so you can leave that alone for now. response.output[1], the model function call is our main point of focus here. Let’s look closely at some tiny details. the id of the function call starts with fc... to differentiate it from other types of model outputs like reasoning above.
Now let’s break down the other key values pairs in our function call map. Take
a look at the call_id value, that is unique to each function call, so we can execute the function and send the result back to the model, it will be able to match the exact function call to the function call output. Even if we call the same function multiple times, each call + result will be unique. "arguments" is a stringified JSON object which we will parse and pass to our function to execute it. Notice that in our toolSchema we defined required arguments for our function as year and countryCode and now the model has returned values for those arguments: year: 2026 and countryCode: FR based on the input we passed to it: What is the next public holiday in France?. How cool is that?
The name value is our tool name get_public_holidays which we will use to execute the function on our side and give the output back to the model. Before we go to the code block that executes the function call, you will notice the line:
conversationHistory.push(...response.output);`We append the model’s returned response.output items to our conversation history before sending tool outputs back. The Responses API expects every function_call_output to be paired with the original function_call item using the same call_id, and for reasoning models (like GPT-5), any reasoning items returned alongside tool calls must also be included in the next request, otherwise the request can fail due to missing references. For simplicity and correctness, we just append the entire response.output array so there are no dangling items.
Handling the Function Call
So, let’s move to handling the function call.
for (const item of response.output) {
		if (item?.type === "function_call") {
			const toolName = item.name;
			const handler = toolHandlers[toolName];
			const rawArgs = item.arguments ?? "{}";
			const args = JSON.parse(rawArgs);
			const public_holiday = await handler(args);
			const output = JSON.stringify(public_holiday, null, 4);

			// add the result of the function call to the conversation history
			conversationHistory.push({
				type: "function_call_output",
				call_id: item.call_id,
				output: output
			});

		console.log(response.output_text);
		}
	}
What this code is doing is basically selecting this function call element from the output list returned by our model:
{
    "id": "fc_0540550ad113a5a4006984957b45a48195bcde6731d55476a9",
    "type": "function_call",
    "status": "completed",
    "arguments": "{\"year\":\"2026\",\"countryCode\":\"FR\"}",
    "call_id": "call_xET4e78dv4dmAJdDzV1MOKsI",
    "name": "get_public_holidays"
  }
So, we use dot notation to select the name get_public_holidays and pass it into the toolHandler, remember toolHandler is a map that links our tool to our function.
const toolHandlers = {
	get_public_holidays: holidayChecker,
}
So what we’re doing in syntax is using toolName as a key to retrieve our function holidayChecker . Next, we retrieve arguments from our function call object and pass it to holidayChecker to call it. And that my friends is function execution. The same way it works in normal programming is how it also works in ai agents. The main difference is an LLM is the one providing the arguments for the function and we send the result of the function to the LLM to decide what do with it. So, we push the result of the function call to our conversation history. If we print out our conversation history, this is what it looks like.
[
  {
    "role": "user",
    "content": "What is the next holiday in France?"
  },
  {
    "type": "function_call_output",
    "call_id": "call_yy7Bos17QHwYPtGwdCTwKtxR",
    "output": "{\"year\":\"2026\",\"countryCode\":\"FR\",\"count\":11,\"holidays\":[{\"date\":\"2026-01-01\",\"localName\":\"Jour de l'an\",\"name\":\"New Year's Day\",\"countryCode\":\"FR\",\"fixed\":false,\"global\":true,\"counties\":null,\"launchYear\":null,\"types\":[\"Public\"]},{\"date\":\"2026-04-06\",\"localName\":\"Lundi de Pâques\",\"name\":\"Easter Monday\",\"countryCode\":\"FR\",\"fixed\":false,\"global\":true,\"counties\":null,\"launchYear\":null,\"types\":[\"Public\"]},{\"date\":\"2026-05-01\",\"localName\":\"Fête du Travail\",\"name\":\"Labour Day\",\"countryCode\":\"FR\",\"fixed\":false,\"global\":true,\"counties\":null,\"launchYear\":null,\"types\":[\"Public\"]},{\"date\":\"2026-05-08\",\"localName\":\"Victoire 1945\",\"name\":\"Victory in Europe Day\",\"countryCode\":\"FR\",\"fixed\":false,\"global\":true,\"counties\":null,\"launchYear\":null,\"types\":[\"Public\"]},{\"date\":\"2026-05-14\",\"localName\":\"Ascension\",\"name\":\"Ascension Day\",\"countryCode\":\"FR\",\"fixed\":false,\"global\":true,\"counties\":null,\"launchYear\":null,\"types\":[\"Public\"]},{\"date\":\"2026-05-25\",\"localName\":\"Lundi de Pentecôte\",\"name\":\"Whit Monday\",\"countryCode\":\"FR\",\"fixed\":false,\"global\":true,\"counties\":null,\"launchYear\":null,\"types\":[\"Public\"]},{\"date\":\"2026-07-14\",\"localName\":\"Fête nationale\",\"name\":\"Bastille Day\",\"countryCode\":\"FR\",\"fixed\":false,\"global\":true,\"counties\":null,\"launchYear\":null,\"types\":[\"Public\"]},{\"date\":\"2026-08-15\",\"localName\":\"Assomption\",\"name\":\"Assumption Day\",\"countryCode\":\"FR\",\"fixed\":false,\"global\":true,\"counties\":null,\"launchYear\":null,\"types\":[\"Public\"]},{\"date\":\"2026-11-01\",\"localName\":\"Toussaint\",\"name\":\"All Saints' Day\",\"countryCode\":\"FR\",\"fixed\":false,\"global\":true,\"counties\":null,\"launchYear\":null,\"types\":[\"Public\"]},{\"date\":\"2026-11-11\",\"localName\":\"Armistice 1918\",\"name\":\"Armistice Day\",\"countryCode\":\"FR\",\"fixed\":false,\"global\":true,\"counties\":null,\"launchYear\":null,\"types\":[\"Public\"]},{\"date\":\"2026-12-25\",\"localName\":\"Noël\",\"name\":\"Christmas Day\",\"countryCode\":\"FR\",\"fixed\":false,\"global\":true,\"counties\":null,\"launchYear\":null,\"types\":[\"Public\"]}]}"
  }
]
You can see that our function returns all the public holidays in France from January to December. This gives our model all the data it needs to answer our question without having to guess or hallucinate. But it’s still too much data than what the model needs, the question is next public holiday not all public holidays. So we leave it to the model to decide what is the relevant information to pick. There is a lot of unneeded text which bloats up the context length of the model. Context length is the total number of tokens that a model can process at once.
GPT-5 for example has a context length of 400k tokens, and tokens are usually smaller than words. So, 400k tokens is roughly 300k words. Also, the context window grows faster than linearly with longer context. So, look at our single turn example for example with only one function, we sent 1 message, the model returns a function call, we add it to our conversation history, we execute the function call and attach the output to our conversation history. if we wanted to send another message, we would have to attach the entire conversation history to the new message and send it to the model again, so the context length can fill up very fast when we are adding tokens that are not useful to the model. So an important part of building agents is managing context effectively and part of that is ensuring that our function only return outputs that are useful to the model. We will cover context management in another part of this series on AI agents.
Returning the Final Response
The final major thing we have to do is create a new response with the function call output in the conversation history so the model can have awareness of it. In this second response we are also using the instructions argument to provide a developer message to the model, a prompt that controls its behaviour for our users.
response = await client.responses.create({
		model: "gpt-5",
		instructions: "Provide the public holiday for the country the user requests.",
		input: conversationHistory,
		tools,
	});

console.log(JSON.stringify(response.output, null, 2));
console.log(response.output_text);
response.output contains the entire output object but output.text contains only the user-friendly assistant message which most people recognize as the agent’s response. Our final assistant message should look something like this:
The next public holiday in France is Lundi de Pâques (Easter Monday) on Monday, 6 April 2026.

Note: In Alsace-Moselle, Good Friday (3 April 2026) is a regional holiday.
Building a Multi-Turn Agent
Next, let’s write a multiturn agent loop.
Tip: You can create a new file in your agent project and call it multi-turn-agent.
/* Existing import statements */
import * as readline from "node:readline";
import { stdin as input, stdout as output } from "node:process";

const client = new OpenAI({
   apiKey: process.env.OPENAI_API_KEY
});

async function runAgentTurn(conversationHistory: ResponseInput, userInput: string) {
   conversationHistory.push( {role: "user", content: userInput });

   while (true) {
   	const response = await client.responses.create({
   		model: "gpt-5",
   		input: conversationHistory,
   		tools,
   		tool_choice: "auto",
   	});

   	conversationHistory.push(...response.output);

   	const toolCalls = response.output.filter((o) => o.type === "function_call");

   	if (toolCalls.length === 0) {
   		// return assistant responses with no function call
   		console.log(`\nAssistant: ${response.output_text}\n`);
   		return; // this breaks the loop?
   	}

   	for (const call of toolCalls) {
   		const toolName = call.name;
   		const handler = toolHandlers[toolName];
   		if (!handler) {
   			// we return ghost function call errors to the model
   			conversationHistory.push({
   				type: "function_call_output",
   				call_id: call.call_id,
   				output: JSON.stringify({ error: `Unknown tool: ${toolName}`}),
   			});
   			continue; // ghost function calls do not break the loop
   	}

   		let result: any;

   		try {
   			const args = JSON.parse(call.arguments || "{}");
   			console.log(args);
   			result = await handler(args);
   		} catch (err: any) {
   			// provide tool errors to the model
   			result = { error: { type: "tool_runtime_error", message: err instanceof Error ? err.message : String(err)} };
   		}

   		conversationHistory.push({
   			type: "function_call_output",
   			call_id: call.call_id,
   			output: JSON.stringify(result)
   		});
   	}
   }
}

async function main() {
   const rl = readline.createInterface({ input, output });
   console.log("Welcome! I'm holiday agent. Ask me anything about public holidays anywhere in the world! \nType exit() to end the chat.");
   const conversationHistory: any[] = [
   	{ role: "developer", content: "Use the provided tools to answer the user's questions"},
   ]

   const ask = (q: string) => new Promise<string>((resolve) => rl.question(q, resolve));

   while (true) {
   	const userText = (await (ask("You: "))).trim();
   	if (!userText) continue;
   	if (userText === "exit()") break;
   	await runAgentTurn(conversationHistory, userText);
   }

   rl.close();
}

main().catch((err) => {
   console.error(err);
   process.exit(1);
});
The code is very similar to the single turn example, but, instead of hardcoding the input to the model inside our agent loop, we will receive it from terminal input. We will also extract the inference loop into a function that we can call as many times as needed as long as we continue to receive new input.
Adding Streaming
Streaming is when we display the output we receive from the model as soon as we get it. If you ran the code in the two previous examples, you’ll see that it takes a few seconds for the text from the model to display. To improve the experience of interacting with our agent, we can print out chunks of uncompleted outputs as soon as they’re available. In the OpenAI Responses API, this is provided through special response.output objects called deltas. You can use the .create() method to implement streaming by setting stream: true as an optional argument, but the Responses API provides a dedicated .stream() method, so we will just use that to write a version of our agent loop that can handle streaming. The main difference is we handle the streaming deltas as events. We use switch-case statements to perform different actions based on the delta that we’re working with. I will copy and paste the entire non-streaming multiturn agent code for the sake of completeness, feel free to ignore and focus on event deltas if that’s more convenient for you.
/* Existing import statements */

const client = new OpenAI({
	apiKey: process.env.OPENAI_API_KEY
});

async function runAgentTurn(conversationHistory: ResponseInput, userInput: string) {
	conversationHistory.push( {role: "user", content: userInput });

	while (true) {
		const response = await client.responses.stream({
			model: "gpt-5.2",
			input: conversationHistory,
			tools,
			tool_choice: "auto",
			reasoning: { effort: "low", summary: "auto" }
		});

		let sawFunctionCall = false;

		for await ( const event of response) {

		switch (event.type) {
			case "response.output_text.delta": {
				process.stdout.write(event.delta ?? "");
				break;
			}

			case "response.reasoning_summary_text.delta": {
				process.stdout.write(event.delta);
				break;
			}

			case "response.output_item.done": {
				const item = event.item;
				conversationHistory.push(item);
				if (item?.type === "function_call") {
					sawFunctionCall = true;
					const functionName = item.name;
					const rawArgs = item.arguments ?? "{}";
					const handler = toolHandlers[functionName];
					const args = JSON.parse(rawArgs);
					const result = await handler(args);
					const output = JSON.stringify(result, null, 2);
					conversationHistory.push({
						type: "function_call_output",
						call_id: item.call_id,
						output
					});
					break;
				}
			}
		}
	}
		if (!sawFunctionCall) {
			process.stdout.write("\n");
			return;
		}
	}
}


async function main() {
	const rl = readline.createInterface({ input, output });
	console.log("Welcome! I'm holiday agent. Ask me anything about public holidays anywhere in the world! \nType exit() to end the chat.");

	const conversationHistory: ResponseInput = [
		{
			role: "developer",
			content: "Use the provided tools to answer the user's questions"
		},
	]

	const ask = (q: string) => new Promise<string>((resolve) => rl.question(q, resolve));

	while (true) {
		const userText = (await (ask("You: "))).trim();
		if (!userText) continue;
		if (userText === "exit()") break;
		await runAgentTurn(conversationHistory, userText);
	}
	rl.close();
}

main().catch((err) => {
	console.error(err);
	process.exit(1);
});
Let’s go over the events that we are handling.
response.output_text.delta: This is the event that returns chunks of the model’s final response
response.reasoning_summary_text.delta: When we are using a reasoning model like gpt-5 we can also stream the model’s reasoning summary.
response.output_item.done: We move our function call and execution here because this is the event returns the complete output item. It is also possible to stream function calls themselves using response.function_call_arguments.delta and response.function_call_arguments.done.
Conclusion
Well done for making it all the way! You have now built your own agent from scratch starting from an agent that could only take one input and return one output, to an interactive agent that you can actually talk to. Finally, we added streaming to improve the quality of our agent experience. We can turn this agent into a coding agent by adding new tools that will allow the agent to perform the tasks required of a coding agent. I built and open-sourced a coding agent, BrilliantCode, you can check out to the repo, to get an idea of what a coding agent looks like under the hood. In the next tutorial in this series, we will build a coding agent from scratch. Thanks for reading and happy building!